When a string is strung on a guitar with a certain tension, there are 2 ways in which the pitch of the strung note can be increased. One way is to shorten the length of the string which is done by pressing down on the frets. The other way is to increase the tension of the string, and bending a note does exactly this.
Bending notes allows the guitarist to reach any pitch between the frets and also can add emotion to a piece of music.
When bending a note, the string is pushed either upwards or downwards while maintaining contact with the fret. As a general guide, the bottom E, A and D strings should be bent downwards (towards the ground). This is due to the fact that if you bend the E string upwards, you would obviously push it off the fingerboard. The rest of the strings, i.e. the G, B and e strings should be bent upwards.
Bending Downwards
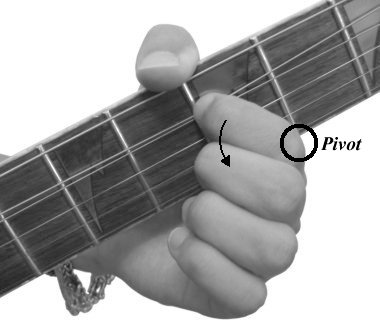
This picture shows a picture of a string being bent downwards. This is achieved by using the point your forefinger touches the side of the neck as a pivot . Using this point, rotate your wrist in an anti-clockwise direction pulling the string downwards as shown. This should be done while using your thumb to counteract the force generated by bending the note.
Bending Upwards

This technique is basically the opposite of the technique shown above. This time the thumb is used as a pivot point and the wrist is rotated in the clockwise direction while pressing down on the fret to achieve an upwards bend. This is shown in the picture above.
If you find the bend difficult it is possible to use multiple fingers to bend the string. This technique is normally only used for upward bends as it is not so effective when bending downwards.
This photograph shows this technique in practice.

The Different Types of Bends
There are several different ways in which you can bend a note:
- The Normal Bend
- The Bend and Release
- The Pre-Bend
- The Reverse Bend
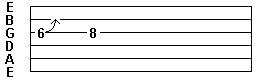
The normal bend involves picking a note and then bending the string until the desired pitch is reached. E.g. Sounding an E and then bending it up to F.
The bend and release involves picking a note, bending the string up to a certain level and then bringing the note back to its original pitch. E.g. Sounding an E, bending it to F and then released back to E.
The pre-bend refers to bending the string up to a certain level without actually picking it. This is used when carrying out the reverse bend.
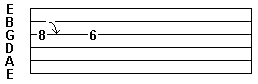
The reverse bend is achieved by pre-bending a string, sounding it and then releasing it to its original pitch. E.g. Pre-bending an E to a F, sounding it and then releasing it to an E.
Guitar Tab Notation
The Normal Bend
The Bend and Release

The Reverse Bend
- Want to improve your guitar playing?
-

These lessons have been written by me, a guitar enthuthiast. I've written them to the best of my abilities, but I'm no guitar teacher!
If you want award-winning, well structured but inexpensive lessons, I strongly recommend you check out Guitar Tricks. They have great range of video guitar lessons from numerous coaches specialising in a wide range of styles.
I've seen their videos, and they're great. With these guys, I'm confident you'll be improving in no time!