In the neck of a guitar there is a metallic rod called the truss rod. This allows the curvature of the guitar neck to be adjusted, which is necessary when changing the string gauge, or when drastic changes occur in temperature and/or humidity (for example when moving the guitar from one country to another).
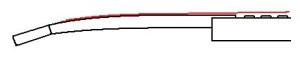
The truss rod in fact looks like this:
A loose truss rod
The tension in the strings on a guitar causes the neck to be pulled upwards. This tension obviously varies with string gauge, hence why you need to adjust the truss rod when change the string gauge.
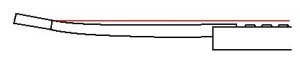
When tightened, the rod becomes curved in the opposite direction from the neck, i.e. downwards as shown in the image below. It’s this fact that allows the truss rod to counteract the upwards pull caused by the strings.
A truss rod under tension
Types of Truss Rods
There are many types of truss rods, such as the common single truss rod, the non-adjustable truss rod, the dual action truss rod and the double truss rod.
- The single truss rod is the truss rod shown in the picture at the top of the page and can be tightened to give the neck back bow (bend the neck downwards to counteract the upwards pull of the strings).
- The non-adjustable truss rod is non-adjustable, as it’s name suggests. It’s not so common and there purely to provide reinforcement for the neck.
- The dual action truss rod can be used to add back bow, but can also be used to increase the curvature of the neck upwards (upwards bow).
- The double truss rod refers to having two truss rods in the neck. This is so that more force can be applied by the truss rods and is used when in guitars with higher string tension, like a 5-string bass or a 12-string guitar.
The Reason for Requiring a Truss Rod
A string on a guitar basically vibrates in an oval shape. This means that the middle of the string vibrates with greatest amplitude, which you can actually see if you sound an open string. For this reason there needs to be a thing called relief, which is a bow half way up the neck. This bow prevents the strings from contacting the frets when playing (which causes buzzing). Here are some over-exaggerated diagrams to clarify what I mean:

Truss rod too loose
This is an example of where the truss rod is too loose. The relief in the neck is so great that the action, which is the distance between the string and the fret, is huge. This will cause difficulty in pressing some of the frets and should be readjusted immediately (seek a specialist).
Truss rod too tight
This on the other hand, is an example of where the truss rod is too tight (back-bow). As you can see, the relief is pretty much non-existent. This means that you’ll get buzzing, or in more extreme cases you won’t be able to sound an open string at all. Again, if your guitar is like this you should seek a specialist.
Truss rod just right
This is the ideal situation where there’s a small amount of bow in the centre of the neck, which accommodates for the way the string vibrates.
Checking Your Neck Relief
There is no such thing as an ideal value for neck relief. It’ll depend on the set-up of the rest of the guitar and your style of playing etc… The neck relief on a guitar can be roughly estimated by pressing down on the 1st fret, and the fret where the neck meets the body of the guitar.
For example on one of my guitars, this would be the fret shown below:
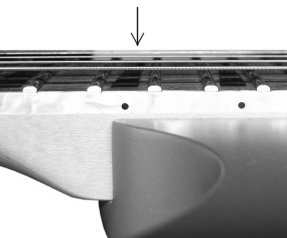
Checking neck relief
While you’re holding these two frets you should check the gap between the string and the top of the 7th fret, where the bow should be greatest. This gives you a general guide to how much relief your guitar has. If this gap is no existent, then you either have a completely straight neck or back bow in which case your truss rod should be loosened.
Conversely, if the relief is huge you would need to tighten the truss rod.
Adjusting the Guitar Truss Rod
It’s not really advisable to adjust the truss rod yourself unless you really know what you’re doing. My advice would be to leave it to a professional. However I’ve included it for the sake of completeness, in case you’re curious about how it’s done. I take no responsibility in any damage caused if you do decide to go ahead and DIY.
The truss rod can usually be accessed from the headstock, and is normally covered by a plastic cover which first needs to be removed.
Once you remove the cover, you’ll see the following:
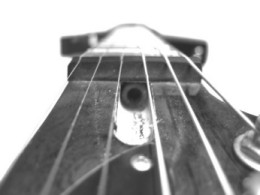
Accessing the truss rod
When adjusting the truss rod, the strings should be loosened. Small adjustments should be made, the guitar tuned and the relief checked. This is should be carried out until the relief is set to the desired amount.
The adjustment itself is made using a hexagonal key. Turning the key in a clockwise direction will tighten the truss rod, which will apply a downwards force on the neck. Turning the key in an anti-clockwise direction will loosen the truss rod, allowing the string tension to pull the neck upwards.
- Want to improve your guitar playing?
-

These lessons have been written by me, a guitar enthuthiast. I've written them to the best of my abilities, but I'm no guitar teacher!
If you want award-winning, well structured but inexpensive lessons, I strongly recommend you check out Guitar Tricks. They have great range of video guitar lessons from numerous coaches specialising in a wide range of styles.
I've seen their videos, and they're great. With these guys, I'm confident you'll be improving in no time!